I consider stationary lunges a “meat and potatoes” type of lower-body exercise, and for good reason. In one move, I can target multiple muscle groups—including the glutes, quads, hamstrings, and calves—with bodyweight anywhere. Lunges are beginner-friendly, too.
Still, lunging in place (or split squats) can get real boring, real fast. The key to spicing up your workout? Get moving more and kick it up a notch with walking lunges. Walking lunges recruit all the major muscles in your legs and don’t call for additional equipment, says Antonia Henry, CPT, a NASM-certified personal trainer and pregnancy and postpartum athleticism coach.
Meet the expert: Antonia Henry, CPT, is a NASM-certified personal trainer, pregnancy and postpartum athleticism coach, and registered yoga teacher.
Because you're moving around your space and alternating legs, walking lunges can feel less tedious. Plus, walking lunges come with an added balance challenge. “The stability requirement in walking lunges comes from it being a unilateral exercise, [meaning] it works one side [of your body] at a time,” she notes. “Additionally, there's the transition time in the movement when you'll just be standing on one leg.”
Ahead, learn all about the perks of walking lunges, as well as tips on how to do walking lunges with perfect form, avoid injuries, and level up the lower-body burner, according to a trainer.
How To Do Walking Lunges With Perfect Form
Although walking lunges look pretty straightforward and you've likely done them in the past, there are a few key technique tips to help get the most out of the movement, according to Henry.
How to:
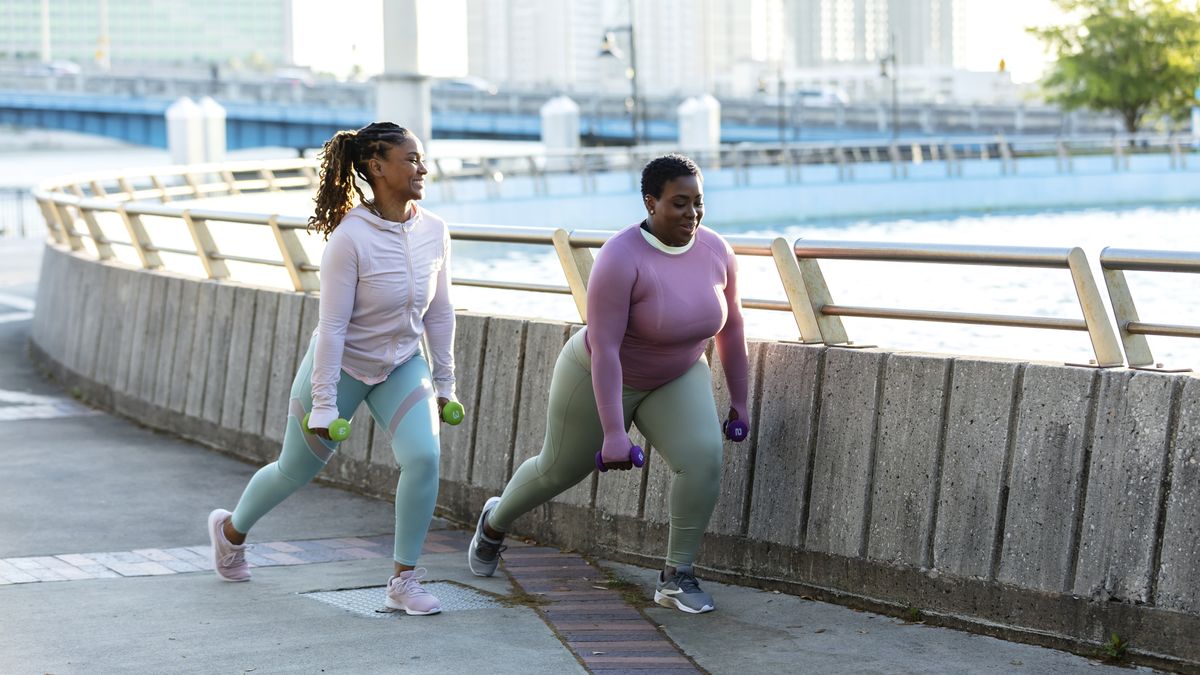
- Stand with your feet hip-width apart, your toes pointing forward, and your hands resting on your hips or clasped in front of your chest, whichever is most comfortable. If you struggle with balance, raise your arms out at your sides to provide some stability, suggests Henry. (Option to hold dumbbells at sides, as shown above.)
- Draw your shoulders down and back away from your ears. Then, engage your core by drawing your belly button up and in toward your ribcage (imagine bracing your stomach as if someone were about to punch you). This step will keep you stable and protect your spine from injury.
- On an inhale, step your right foot forward about two feet, making sure to keep it aligned with your right hip. Redistribute your weight evenly throughout your foot.
- Slowly bend your right knee to lower your body to the floor. Pause when your right knee forms a 90-degree angle and your right thigh is parallel to the floor. Your left knee should be bent to roughly 90 degrees and hovering a few inches off the floor, but you can also gently tap it on the ground. Just make sure to avoid resting your left knee on the floor, which will release the muscular tension you’re building.
- On an exhale, engage your glutes and quads and press through your entire right foot to straighten your right leg. As you return to standing, allow your left foot to lift off the ground behind you, sweeping it forward to meet your right.
- Without allowing your left foot to touch the floor, take a step forward with your left foot and repeat the lunge on your left side. If that’s too difficult, briefly tap your left foot on the ground next to your right to regain your balance before moving into your next lunge. That's 1 rep.
How To Add Walking Lunges To Your Workout Routine
You’re best bet is performing them at the beginning of your workout, when you’re still mentally energized and your body is fatigue-free, according to Henry. Why? Walking lunges are a compound exercise—meaning they utilize multiple muscle groups and joints—so they can be a bit taxing on the body.
Complete three sets of six to 12 reps on each leg during your usual lower-body workouts, suggests Henry.
Walking lunges can be used as your main exercise in your lower-body workouts, but they also pair well with squats and deadlifts, so consider incorporating the moves into a killer glute-building circuit. “[With] any deadlift variation, you're really going to be hitting those glutes and hamstrings—and everyone wants a bigger booty,” notes Henry.
Walking Lunge Benefits
Everyone from fitness newbies to strength training pros can benefit from adding walking lunges to their routine. Here are the exercise’s most noteworthy perks.
- They give you an efficient workout. Walking lunges are a compound exercise that targets the major muscle groups below your hips, including your glutes, quads, hamstrings, and calves, says Henry. In turn, you’ll work all of your lower-body muscles in much less time than if you were to perform separate isolation exercises for each muscle group.
- They help address muscle imbalances. It’s totally normal for one side of your body to be a bit stronger than the other. But when these imbalances are significant, they can lead to movement compensations that ultimately lead to injury, according to the American Council on Exercise. The good news: Walking lunges are a unilateral exercise. In case you forgot, unilateral exercises challenge just one side of your body at a time, so they can clue you in on any serious muscle imbalances between your legs, says Henry. “Unilateral movements help us identify [strength differences] and decide if and when we need to work on [correcting] them,” she adds.
- They can help you squat heavier. “For people who are interested in heavy squatting, doing lunges as an accessory movement is a super smart idea,” says Henry. A squat utilizes both legs at the same time, so getting both of your legs to an equal level of strength via walking lunges can help you squat with even more weight, she explains.
- They’re ideal for home workouts. If you don’t have access to heavy weights, opt to train your lower body with a unilateral exercise such as walking lunges rather than a bilateral move. “Most of the time, people aren't going nearly as heavy on lunges as they are on squats [since they recruit only the muscles in one leg at a time],” says Henry. “So it's also another way that you can work the same muscles with slightly lower effort.”
3 Walking Lunge Variations
Bodyweight walking lunges will surely put the muscles in your lower half to the test, but if you want to take the challenge up a notch, you absolutely can with these variations.
1. Kettlebell Walking Lunge
Why it rocks: Adding load, such as holding a kettlebell in front of your chest, to your walking lunge is the easiest way to level up the exercise, says Henry.
How to:
- Stand with your feet hip-width apart and your toes pointing forward. Hold the bell of a kettlebell with both hands in front of your chest.
- Draw your shoulders down and back away from your ears. Then, engage your core by drawing your belly button up and in toward your ribcage (imagine bracing your stomach as if someone were about to punch you).
- On an inhale, step your right foot forward about two feet, making sure to keep it aligned with your right hip. Redistribute your body weight evenly throughout your foot.
- Then, slowly bend your right knee to lower your body to the floor. Pause when your right knee forms a 90-degree angle and your right thigh is parallel to the floor. Your left knee should be bent to roughly 90 degrees and hovering a few inches off the floor, but you can also gently tap it on the ground.
- On an exhale, engage your glutes and quads and press through your entire right foot to straighten your right leg. As you return to standing, allow your left foot to lift off the ground behind you, then sweep it forward to meet your right. That’s one rep.
- Without allowing your left foot to touch the floor, take a step forward with your left foot and repeat the lunge on your left side.
2. Walking Lunge With Twists
Why it rocks: For an extra core challenge, twist your torso to the side as you lower down into the lunge. This variation also trains your body in the transverse plane of motion, which helps to stabilize and strengthen joints that are often more mobile and susceptible to injury, such as the hips and spine, according to the National Academy of Sports Medicine.
How to:
- Stand with your feet hip-width apart and your toes pointing forward. Hold the bell of a kettlebell with both hands in front of your chest.
- Draw your shoulders down and back away from your ears. Then, engage your core by drawing your belly button up and in toward your ribcage (imagine bracing your stomach as if someone were about to punch you).
- On an inhale, step your right foot forward about two feet, making sure to keep it aligned with your right hip. Redistribute your body weight evenly throughout your foot.
- Then, slowly bend your right knee to lower your body to the floor. Pause when your right knee forms a 90-degree angle and your right thigh is parallel to the floor. Your left knee should be bent to roughly 90 degrees and hovering a few inches off the floor, but you can also gently tap it on the ground.
- At the bottom of your lunge, rotate your torso to the right as far as is comfortable or until the kettlebell is aligned with your hips. Make sure to keep your hips square to the front and your right knee bent at a 90-degree angle.
- Pause, then slowly rotate your torso back to the center.
- On an exhale, engage your glutes and quads and press through your entire right foot to straighten your right leg. As you return to standing, allow your left foot to lift off the ground behind you, then sweep it forward to meet your right.
- Without allowing your left foot to touch the floor, take a step forward with your left foot and repeat the lunge and twist on your left side. That's 1 rep.
3. Offset Weighted Walking Lunge
Why it rocks: Level up by holding one dumbbell or kettlebell in a front-rack position on just one side of the body. This position requires your core to put in overtime, says Henry. All the abdominals kick in to keep your torso upright as you lunge with the uneven weight.
How to:
- Stand with your feet hip-width apart, your toes pointing forward, your left hand resting on your hip, and your right hand holding a dumbbell (or kettlebell) in the front rack position. Keep your right elbow tucked close to your body and rest the end of the dumbbell on your right shoulder.
- Draw your shoulders down and back away from your ears. Then, engage your core by drawing your belly button up and in toward your ribcage (imagine bracing your stomach as if someone were about to punch you).
- On an inhale, step your right foot forward about two feet, making sure to keep it aligned with your right hip. Redistribute your body weight evenly throughout your foot.
- Slowly bend your right knee to lower your body to the floor. Pause when your right knee forms a 90-degree angle and your right thigh is parallel to the floor. Your left knee should be bent to roughly 90 degrees and hovering a few inches off the floor. (You can also gently tap it on the ground.)
- On an exhale, engage your glutes and quads and press through your entire right foot to straighten your right leg. As you return to standing, allow your left foot to lift off the ground behind you, then sweep it forward to meet your right.
- Without allowing your left foot to touch the floor, take a step forward with your left foot and repeat the lunge on your left side. That’s 1 rep.
Walking Lunge Safety Tips
Walking lunges are a safe and effective exercise for most individuals, but folks who have a history of knee injury may want to chat with their doctor before trying them, as the exercise can place additional stress on the joint, says Henry. If you get the green light, take extra care to avoid hitting your knee on the floor as you lower into your lunge, she advises.
Start with bodyweight and support. If you’re a beginner or struggle with balance, practice bodyweight walking lunges until your form improves, she suggests. You may also want to do your reps a foot or two away from a wall so you can extend out your arm and steady yourself.
Wear the right sneakers for optimal stability. “If you're wearing running shoes with a lot of padding in them, it's going to make [walking] lunges way harder than they need to be,” says Henry. “I would definitely suggest something without padding, like Converse, Metcons, or Vans, or you can just take your shoes off for your lunges.”
Keep feet hip-width apart. The biggest way to reduce the risk of toppling over, though, is to make sure to keep your feet hip-width apart throughout the entire set, says Henry. “The number one mistake that I see people make, which makes walking lunges seem so much more difficult, is that as they are stepping out, they end up doing a tightrope walk,” she explains. “They're putting just one foot right in front of the other, which makes you get really off-balance.”
Work with a pro. If you'd prefer a bit more personalized guidance (concern about injury or are struggling with your form), definitely connect with a certified personal trainer or strength coach. These pros will help you feel comfortable and confident performing walking lunges—and get you one step closer to building a strong lower body.


